|
||
|
||
| You are in: Dudleyville Home > Baldur's Gate Walkthrough > Durlag's Labyrinth Level 2 | Version: 2.0a |
Main Navigation
|
 Durlag's
Labyrinth L2
Durlag's
Labyrinth L2
Location code: AR0512
Next stop: Durlag's
Labyrinth Level 3
Non-respawning: Dwarven
Doom Guard, Ghasts,
Greater Doppelgangers
Sleep disturbed by: Greater
Doppelgangers
 Traps
Traps
Single click the map
to reveal the traps.
Double-click the map to hide the traps.
The hidden doors are not shown on this map. They are all fairly easily detectable. Just stand in each room until they show up. Some are warded and can only be opened by specific events described below.
Some doors will lock automatically if you sleep on this level. To avoid being trapped in a room it is best to sleep in the entrance chamber or on the previous level. *
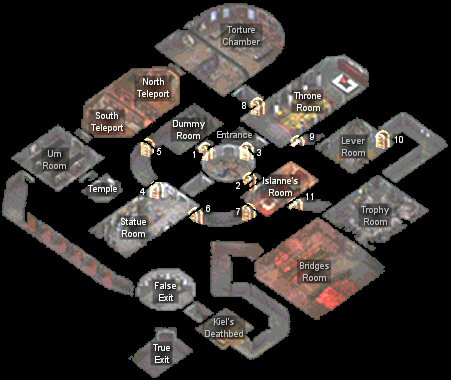
The lever room
There are 11 levers in this room. Imagine that the levers in the top row are lettered A - E from left to right and the bottom row is F - K. Activating each lever opens or closes the following doors numbered door on the map:
| A - 1 | B - 2 | C - 3 | D - 4 | E - 5 | |
| F - 6 | G - 7 | H - 10 | I - 11 | J - 8 | K - 9 |
 The
great many doors puzzle
The
great many doors puzzle
You begin in a circular entrance chamber. Enter the statue room. Turn the NW statue (always opens Door 1 and closes Door 2). Turning the SE statue always opens Door 2 and closes Door 1.
Return to the entrance chamber and enter the dummy room. Attack the bronze Sparring Dummy (opens Doors 4 and 5 and closes Door 1 - once only). A false Durlag will appear just behind Door 5 and teleport around the room before attacking with a Stinking Cloud spell. Kill him. Attack the silver dummy (1st trigger necessary to open Door 3). Attack the red dummy (always opens or closes Door 2).
Enter Islanne's room. Removing Fuernebol's Wardstone from the NW bedside table opens or closes Door 1. Remove Kiel's Wardstone from the NE bedside table (2nd trigger necessary to open Door 3). Remove Islanne's Wardstone from the table (opens Doors 6 and 7 and closes Door 2 - once only). A false Durlag will appear just behind Door 7 and teleport around the room before attacking with a Fireball spell. Kill him.
Enter the throne room. You can open the locked doors 8 and 9. Door 9 provides access to the lever room which may be useful if you've shut yourself off from somewhere inadvertently. If you want to make the coming throne room fight easier you should leave everyone except a hasted (or Boots of Speed) character in the entrance chamber. Send the speedy character to grab the helmet and run back to join the group before Door 3 closes. Collect Kiel's Helmet from the foot of the throne (opens Door 3). A false Durlag will appear and teleport around the room (opens Doors 8 and 9 and closes Door 3). He will summon a false Islanne and Fuernebol. They will attack with two Stinking Clouds and a Cloudkill spell. Kill them. Strangely enough when I played this part they died from the effects of their own spells before I could kill them! Door 10 can be unlocked.
Enter the torture chamber. Enter the North Teleport room and two Dwarven Doom Guards will appear in the torture chamber behind you. Kill them. Collect the Teleportation Wardstone from the trapped pot in the North Teleport room. The floor sigil will glow. Click on it to teleport to the South Teleport room. The trapped pot in the South Teleport room also contains a Teleportation Wardstone if you don't already have one.
Enter the urn room. Enter the small temple room. Raid the trapped statue for the Level 2 Exit Wardstone. Enter the corridor south of the urn room. Several Ghasts will appear and probably trigger a Fireball trap further down the corridor thus killing themselves. This will not disarm the trap so beware. Enter the false exit room. The false stairs are trapped and will summon Skeleton Warriors if you fancy a fight. The door to the true exit will open if you have the Level 2 Exit Wardstone.
Enter Kiel's room. Stealing Kiel's magic items from the trapped and locked trunk at the foot of the bed will cause the four Dwarven Doom Guards to attack. Kill them.
Enter the bridges room. Three Greater Doppelgangers
will attack. Kill them. The door
leading to the trophy room can be unlocked though
there is nothing of interest in there. Return to the
exit and leave to Durlag's
Labyrinth Level 3.
LOOT: Kiel's
Helmet, Level 2 Exit Wardstone
Statue room
Raid the trapped and locked globe.
LOOT: Potion of Healing (4), Antidote, [Greater
Malison], [Haste] (5), Water Opal, 346gp
Dummy room
Raid the bronze, red and silver sparring dummies.
LOOT: Arrows +1 (19), Acid Arrows (5), Arrows of
Fire (11), Arrows of Ice (12), Arrows +2 (6), Potion
of Master Thievery, Potion of Healing (8), Potion of Heroism (2), [Otiluke's
Resilient Sphere], [Defensive Harmony], [Protection from
Lightning], [Champion's Strength]
Islanne's room
Raid the wardrobe.
LOOT: Bullets +2 (8), Darts of Stunning (7), Darts
(20), Darts of Wounding (17), Darts +1 (11), Adventurer's
Robe, [Domination], [Spirit Armor], [Remove Curse], [Monster
Summoning II], 331gp
Torture chamber
Search the floor x 1400 y 548.
LOOT: Durlag's Goblet (cursed)
Urn room
Raid the four trapped urns and the statue.
LOOT: Bolts +1 (9), Bolts of Lightning (20), Bolts
of Biting (11), Potion of Healing (4)
Temple
Raid the two small tables.
LOOT: Arrows +1 (15), Bolts of Biting (14), Bullets
+1 (20), Bullets +2 (16), Potion of Freedom, Potion
of Master Thievery, Oil of Speed, [Polymorph Self], [Emotion -
Hopelessness], 112gp
Kiel's room
Raid the trapped and locked trunk and locked trunk.
LOOT: Kiel's Morningstar (cursed), Kiel's Buckler,
Potion of Healing (3), Potion of Hill Giant Strength,
Potion of Frost Giant Strength, 432gp
Bridges room
Raid the trapped brick in the wall at x 2002 y 1390.
LOOT: [Chaotic Commands], [Protection from Evil 10'
radius], 1157gp
* items and/or changes are only available if you have installed the DudleyFixes.
© 2006 www.dudleyville.com (XHTML)